SOLR CLOUD + ZOOKEEPER + WINDOWS
Introduction
This small tutorial aims to introduce how to configure SOLR + ZOOKEEPER in a Windows environment. This configuration is an introductory example, for more information about, please check the SOLR official site.
Besides the configuration example, we will present some commands used to verify the Solr cloud using the zookeeper client.
Directories structure
All configurations were made under the directory C:\solr. To begin first, download SOLR and ZOOKEEPER. In this tutorial, the following versions were applied:
Then, unzip the downloaded files under the C:\solr folder. After that create two more folders solr_cloud and zookeeper_data.
The directory structure layout should be similar as:
- C:\solr\solr-7.3.0
- C:\solr\zookeeper-3.4.13
- C:\solr\solr_cloud
- C:\solr\zookeeper_data
Before start to configure Zookeeper and Solr, be sure that JAVA_HOME environment variable is configured.
Zookeper
ZooKeeper is a distributed coordination service to manage a large set of hosts. Basically, it uses a concept of the virtual file system that is shared among the participant’s nodes of an ensemble. In this VFS new nodes can publish, query and listen for data. A good start point to study zookeeper concepts is available at Tutorialspoint.
Before to configure Solr, the zookeeper is first necessary because it will be used to persist the Solr file configurations and manage the cluster policies. The Solr and zookeeper documentation indicates to have at least three servers in the cluster. However, in this small introductory tutorial, only one will be applied.
To configure the zookeeper, first rename the file from zoo_sample.cfg to zoo.cfg. This file is present in the directory C:\solr\zookeeper-3.4.13\conf. After that, open this file and edit the property dataDir to the directory C:/solr/zookeeper_data. Pay attention to the folder separator, even in windows, the folder separator should keep the Linux character. The file should be similar to the following:
tickTime=2000
initLimit=10
syncLimit=5
dataDir=C:/solr/zookeeper_data
clientPort=2181
The zookeeper configuration is ready. Thus, open a new terminal window and go to the zookeeper bin directory.
cd C:\solr\zookeeper-3.4.13\bin
Now start the zookeeper server. In this case, the zookeeper will be started at 2181 port.
zkServer.cmd
Now, to check if the zookeeper is up and working properly, open a new terminal session and go to the zookeeper bin directory again. Then start the zookeeper client with the following command:
zkCli.cmd
If everything is working, the connection with zookeeper will be opened successfully and you will view something like this:
…
WATCHER::

WatchedEvent state:SyncConnected type:None path:null

[zk: localhost:2181(CONNECTED) 0]
Now, you have access to the zookeeper virtual directory. For example, type the following command to list the root zookeeper directory.
[zk: localhost:2181(CONNECTED) 0] ls /
[zookeeper]
If you check the zookeeper data directory configured in zoo.cfg (C:\solr\zookeeper_data), all data that zookeeper will store is persisted there. It means that all SOLR files configuration will be stored in this directory. Even zookeeper persisting this files in the disk is a good point to have the source code versioned to keep track of these files.
SOLR
Solr is the popular, blazing-fast, open source enterprise search platform built on Apache Lucene™. And in this tutorial, a simple Solr cloud configuration will be presented.
SOLR and ZOOKEEPER
The first thing to do is configure SOLR with an isolated zookeeper server instance. Therefore, first upload the solr.xml to the zookeeper directory. This is made with the following command executed under the Solr dir:
C:\solr\solr-7.3.0> bin\solr zk cp file:C:\solr\solr-7.3.0\server\solr\solr.xml zk:/solr.xml -z localhost:2181
Copying from 'file:C:\solr\solr-7.3.0\server\solr\solr.xml' to 'zk:/solr.xml'. ZooKeeper at localhost:2181
After that, the configsets need to be uploaded to the zookeeper. The configsets are the schemas definition to create collections. There are some different ways to upload these files to zookeeper. One of that is starting a Solr server that upload this files automatically and one other is uploading these files manually. In this case, we will upload this files manually with the following command:
C:\solr\solr-7.3.0> bin\solr zk upconfig -n _default -d C:\solr\solr-7.3.0\server\solr\configsets\_default -z localhost:2181
Uploading C:\solr\solr-7.3.0\server\solr\configsets\_default\conf for config _default to ZooKeeper at localhost:2181
We can check if everything is right executing the following commands in the zookeeper client:
[zk: localhost:2181(CONNECTED) 1] ls /
[solr.xml, configs, zookeeper]
[zk: localhost:2181(CONNECTED) 5] ls /configs
[_default]
[zk: localhost:2181(CONNECTED) 6] ls /configs/_default
[managed-schema, protwords.txt, solrconfig.xml, synonyms.txt, stopwords.txt, lang, params.json]
SOLR NODES
Now we will configure the server nodes. In this simple tutorial, we will create a different directory to persist the index data, the directory “C:\solr\solr_cloud” that was created previously. Besides that, the objective is to test Solr with two different computers and each one executing two isolated server instances. The defined architecture is presented as follows:
- PC 1 – Node 1 – port 8983
- PC 1 – Node 2 – port 8984
- PC 2 – Node 1 – port 8983
- PC 2 – Node 2 – port 8984
To start more than one server in the PC 1, a custom log configuration is necessary because servers cannot share the default log file in the folder C:\solr\solr-7.3.0\server\logs. To support this architecture execute the following steps:
- Create the directory
C:\solr\solr_cloud\resources - Copy
C:\solr\solr-7.3.0\example\resources\log4j.propertiestoC:\solr\solr_cloud\resources - Create the solr directories:
C:\solr\solr_cloud\cloud\node1andC:\solr\solr_cloud\cloud\node2 - Create the index directories:
C:\solr\solr_cloud\cloud\node1\solrandC:\solr\solr_cloud\cloud\node2\solr - Create the log directories:
C:\solr\solr_cloud\cloud\node1\logsandC:\solr\solr_cloud\cloud\node2\logs
To start the nodes, before is necessary to change the environment variables to point properly for the log folders. First, execute the following command to define the log configuration file:
set LOG4J_CONFIG=file:C:\solr\solr_cloud\resources\log4j.properties
Then change the server log directory:
set SOLR_LOGS_DIR=C:\solr\solr_cloud\cloud\node1\logs
Then start the first SOLR node. In this case, the -z parameter indicates the zookeeper, -s the Solr directory, -c the cloud mode and -p the server port.
bin\solr start -c -p 8983 -s "C:/solr/solr_cloud/cloud/node1/solr" -z localhost:2181
Then start the second node. First, change the log directory to node 2:
set SOLR_LOGS_DIR=C:\solr\solr_cloud\cloud\node2\logs
Then start the node 2 server in a new port:
bin\solr start -c -p 8984 -s "C:/solr/solr_cloud/cloud/node2/solr" -z localhost:2181
To configure the PC 2, execute the same steps to configure the Solr server. But now change the -z parameter to appoint to the IP of the zookeeper computer.
set LOG4J_CONFIG=file:C:\solr\solr_cloud\resources\log4j.properties
set SOLR_LOGS_DIR=C:\solr\solr_cloud\cloud\node1\logs
bin\solr start -c -p 8983 -s "C:/solr/solr_cloud/cloud/node1/solr" -z 192.168.2.6:2181
set SOLR_LOGS_DIR=C:\solr\solr_cloud\cloud\node2\logs
bin\solr start -c -p 8983 -s "C:/solr/solr_cloud/cloud/node2/solr" -z 192.168.2.6:2181
If everything is right the servers should be accessible at the URLs:
- PC1_IP:8983/solr/#/
- PC1_IP:8984/solr/#/
- PC2_IP:8983/solr/#/
- PC2_IP:8984/solr/#/
Or checking in the zookeeper client the active nodes:
[zk: localhost:2181(CONNECTED) 8] ls /live_nodes
[192.168.2.5:8983_solr, 192.168.2.6:8983_solr, 192.168.2.6:8984_solr, 192.168.2.5:8984_solr]
SOLR creating core
To create a Solr cloud collection, execute the following command:
bin\solr create -c sample_project -s 4 -rf 2 -d _default -n _default
This command will create a new core named sample_project (param -c), with the config _default (param -d) using the existing config _default from zookeeper(param -n). The parameter -s define the number of shards, that is, the number of chunks that Solr will use to segment the index. And the parameter -rf define the replication factor, that is the number of copies available for each shard. The replication factor is used as a failover mechanism in case of failures. To validate that everything is right, we can check in zookeeper the status with the following command:
[zk: localhost:2181(CONNECTED) 12] ls /collections
[sample_project]
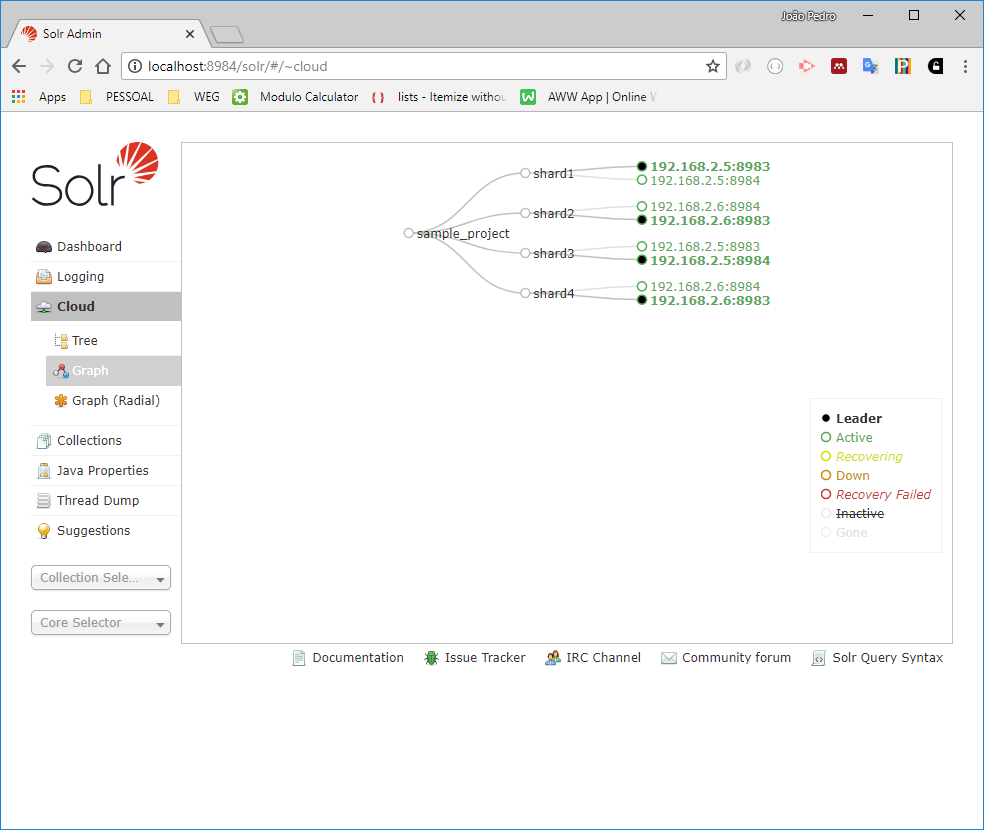
A more user-friendly way to check the architecture is inspecting the cloud information in the Solr WEB page, that will be similar to the following figure:
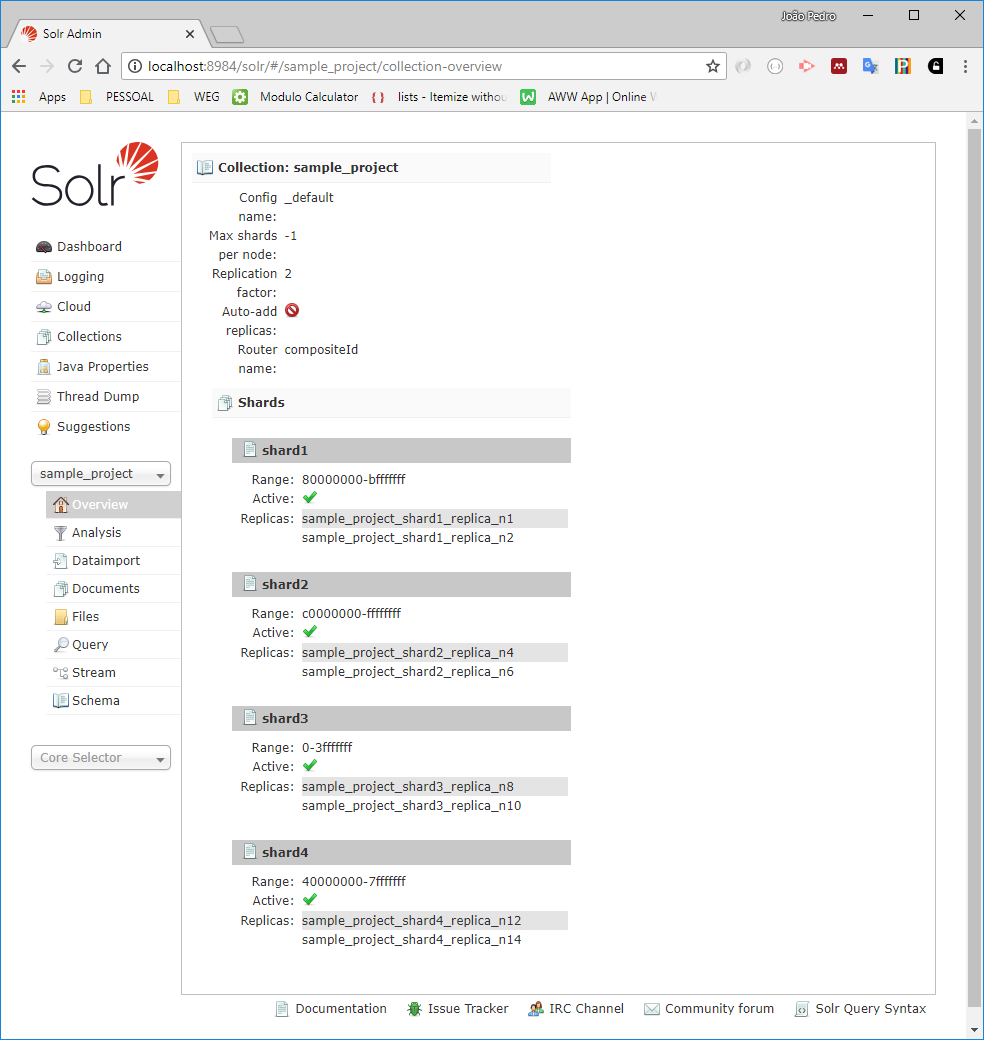
And about the core information:
Conclusions
This project presented how to configure Solr cloud integrated with an isolated zookeeper instance in the Windows operating system. Besides that, was presented how to interact with the zookeeper to extract information about the Solr cloud. The next step is starting to upload data to the created core and execute queries.